Galapagos Tech Blog

株式会社ガラパゴスのメンバーによる技術ブログです。

MSWでAPI開発前にフロントエンド開発を行う

AIR Design for Marketing 事業部 フロントエンドエンジニアのHashigoです。

私は2022年1月に入社する以前は、主にtext/htmlをレスポンスとして受け取ってコーディングを行うフロントエンド環境で開発を行っていました。

現在、私が参加しているプロジェクトではReactで開発を行なっており、且つCSR(Client Side Rendering)のみのSPAであるため、初期表示の時、React側でGETのHTTPリクエストを行うことが多々あります。その場合、初期表示を行うだけでも「待機」「成功」「失敗」という状態をコンポーネント側で持つ必要があります。

text/htmlを受け取るフロントエンド開発では、初期値はサーバーサイドから既に受け取った状態であることが多く、「待機」=「ブラウザのローディング」で、「失敗」の場合もサーバーサイドから返ってくるhtmlがそもそも違うので、フロント側で考慮することがあまりありませんでした。そして、そういった場合の開発では、フロントエンドを先行で開発していても、初期表示に関しては直書きの値を変数に置き換える作業で終止することが主だったと記憶しています。

React(SPA)では、フロントエンドを先行して開発する場合に、変数に当たる箇所を直書きすると、いざAPIからデータを取得するコードを書いた時に、API通信の状態をフォローできていなくて、APIと繋ぎ込む実装が思ったよりも工数がかかってしまった、ということがありました。

そこで、いろいろな記事で紹介されているMSW(Mock Service Worker)を使用して、API開発前にフロントエンド実装を行ったところ、開発体験が良く、実際のAPIを繋ぎ込む作業が以前より楽に行えました。また、私はAPI開発をしたことが無いので、API開発の触りを学ぶという意味でもとても良い経験でした。

今回は、API通信の状態を考慮できるようにUI開発の下地としてMSWを使ってHTTPリクエストのモックを作成したいと思います。

Mock Service Worker

mswjs.io

執筆時点のバージョンはv0.44.2です。

1 MSWでHTTPリクエストのモックを定義

ドキュメントにはセットアップや各APIについて丁寧に解説されていますので、こちらに沿って進めていきます。

今回はREST API & Create React Appを想定したコードを記述しています。

1-1 MSWのインストール

npm install msw --save-dev
# or
yarn add msw --dev

こちらでpackage.jsonに追加されます。

1-2 モックの定義

モックを定義するためのファイルを格納するディレクトリを作成します。

mkdir src/mocks

次にHTTPリクエストのハンドラーを書くファイルを作成します。

touch src/mocks/handlers.ts

今回は、色の名前とカラーコードのリストを取得するAPI(GET)、新しい色をリストに追加するAPIのモック(POST)を作成します。そのために、レスポンス用のデータを用意します。

// src/mocks/data/colors.json
[
  {
    "id": "uuid-1",
    "name": "Red",
    "code": "#ef4444"
  },
  {
    "id": "uuid-2",
    "name": "Orange",
    "code": "#fb923c"
  },
  {
    "id": "uuid-3",
    "name": "Yellow",
    "code": "#facc15"
  },
  {
    "id": "uuid-4",
    "name": "Green",
    "code": "#22c55e"
  }
]

次にhandlers.tsにHTTPリクエストを処理するための関数を書きます。

まずは、先ほどのJSONをimportし、色の一覧を取得するGETリクエストのハンドラーとリゾルバーを作ります。
(別途JSONファイルを用意する必要はなく、直接オブジェクトを書いても大丈夫です。)

// src/mocks/handlers.ts
import { rest } from "msw";
import colors from "./data/colors.json";

export const handlers = [
  rest.get("/mock/colors-list", (req, res, ctx) => {
    return res(ctx.status(200), ctx.json(colors));
  }),
]

MSWドキュメン上では、rest.get()をhandler、handlerの第二引数のコールバック関数をresolverと呼んでいます。

resolverに渡される3つの引数は、順番に下記のようになっています。

  • request(req) → リクエストに関する情報が入ったオブジェクト
  • response(res) → モックされたレスポンスのオブジェクトを作成する関数
  • context(ctx) → レスポンスの内容を変換する関数群が入ったオブジェクト

続けて、新しい色をリストに追加するPOSTリクエストを作ります。
ついでに、同じカラーコードがあった場合はエラーを返すようにしたいと思います。

// src/mocks/handlers.js
import { rest } from "msw";
import colors from "./data/colors.json";

// 追記
type ReqBody = {
  name: string;
  code: string;
};
type ResBody = {
  id: string;
  name: string;
  code: string;
};

export const handlers = [
  rest.get("/mock/colors-list", (req, res, ctx) => {
    return res(ctx.status(200), ctx.json(colors));
  }),

  // 追加
  rest.post<ReqBody, ResBody>("/mock/create-color", async (req, res, ctx) => {
    const { name, code } = await req.json();

    if (colors.find((color) => color.code === code)) {
      // 重複するカラーコードがあった場合はエラー
      return res(
        ctx.status(409),
        ctx.json({
          errorMessage: `${code}は既に登録されています。`,
        })
      );
    };
    
    return res(
      ctx.status(201),
      ctx.json({
        id: "uuid-5",
        name,
        code,
      })
    );
  }),
]

requestとresponseの各bodyの値の型付けと、request bodyの取得方法に悩みましたが、
resolver関数の第二引数をasyncにするなど、下記のようににすることで、無事に取得できるようです。

rest.post<ReqBody, ResBody>("/mock/create-color", async (req, res, ctx) => {
    const { name, code } = await req.json();

書き方については、下記の記事とMSWトップページのTypeScriptバージョンが参考になりました。

dev.to

※req.bodyはエディタ上で非推奨と表示され、MSWドキュメントにも記述がありませんでした。

2 MSWで定義したモックAPIを動かす

2-1 MSWを初期化

npx msw init <PUBLIC_DIR> --save

# Create React Appの場合はこちら
npx msw init public/ --save

<PUBLIC_DIR>の部分はプロジェクトごとにビルドされて公開されるディレクトリを指定します。

使っているフレームワークやライブラリによる違いは下記で確認できます。

Browser - Getting Started - Mock Service Worker Docs

2-2 Service Workerを起動させるためのファイルを作成

touch src/mocks/browser.ts

続いて、作成したbrowser.tsに下記を記述してリクエストハンドラーを渡してService Workerインスタンスを作成します。

// src/mocks/browser.ts
import { setupWorker } from "msw";
import { handlers } from "./handlers";

// This configures a Service Worker with the given request handlers.
export const worker = setupWorker(...handlers);

setupWorker関数はリクエストハンドラーを受け取り、作成したService Workerインスタンスを操作するメソッドを返してくれるそうです。

setupWorker() - Api - Mock Service Worker Docs

2-3 Service Workerを起動

It's not recommended to include Mock Service Worker in production. Doing so may lead to a distorted experience for your users.

https://mswjs.io/docs/getting-started/integrate/browser#start-worker

上記注意書きのように、production環境では動作させないように先ほどのworkerインスタンスをimportして、Reactのindex.tsでService Workerをアクティブにします。

import React from "react";
import ReactDOM from "react-dom/client";
import App from "./App";

if (process.env.NODE_ENV === "development") {
  const { worker } = require("./mocks/browser")
  worker.start()
}

const root = ReactDOM.createRoot(
  document.getElementById("root") as HTMLElement
);
root.render(
  <React.StrictMode>
    <App />
  </React.StrictMode>
);

ここでようやく、Create React Appを起動します。

npm start
# or
yarn start

localhostが立ち上がったら、ブラウザのdevtoolでコンソールを確認します。

MSW Mocking enabled.

こちらが表示されていれば、無事に立ち上げ完了です 🎉

ちなみに、yarn buildなどプロダクションビルドすると、上記は表示されず、Service Workerが有効では無いことが分かります。

3 UIからHTTPリクエストをモックしてみる

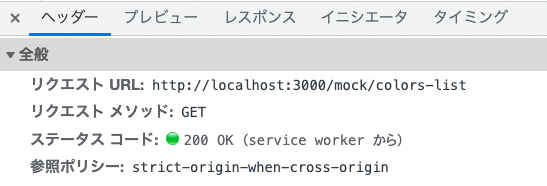
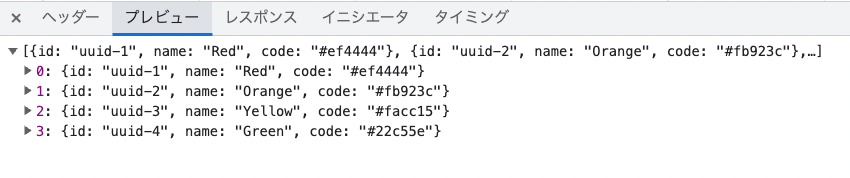
3-1 まずは、GETリクエストで一覧を取得してみる

下記のようなコードでMSWで定義したAPIにfetchしてみます。

const [colors, setColors] = useState([]);

useEffect(() => {
  getColors();
}, []);

const getColors = async () => {
  try {
    const response = await fetch("/mock/colors-list");

    if (!response.ok) {
      throw new Error("色の一覧取得に失敗しました");
    }

    const colors = await response.json();
    setColors(colors);

  } catch (error) {
    if (error instanceof Error) {
      console.error(error.message);
    }
  }
};

すると、ブラウザdevtoolのネットワークを見ると、画像のようにちゃんとレスポンスが返ってきています。

Google Chromeデベロッパーツールのネットワークタブ

Google Chromeデベロッパーツールのネットワークタブ

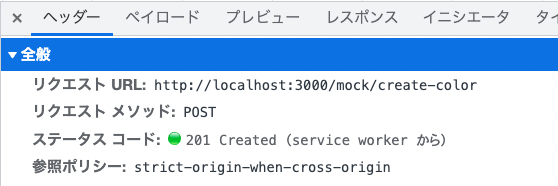
3-2 POSTリクエストで新しいデータを追加してみる

下記のコードでformからPOSTメソッドでfetchしてみます。

const [colors, setColors] = useState([]);

const handleSubmit = async (e: React.SyntheticEvent) => {
  e.preventDefault();

  // formから取得したinputのvalue
  const target = e.target as typeof e.target & {
    name: { value: string };
    code: { value: string };
  };
  const name = target.name.value;
  const code = target.code.value;

  try {
    const response = await fetch("/mock/create-color", {
      method: "POST",
      body: JSON.stringify({
        name,
        code,
      }),
    });

    if (!response.ok) {
      const error = await response.json();
      throw new Error(error.errorMessage);
    }

    const newColor = await response.json();
    setColors([...colors, newColor]);

  } catch (error) {
    if (error instanceof Error) {
      console.error(error.message);
    }
  }
};

return (
  <div className="App">
    {colors.length !== 0 && (
      <ul>
        {colors.map((color, index) => (
          <li>
            <dl>
              <dt>{color.name}</dt>
              <dd>{color.code}</dd>
            </dl>
          </li>
        ))}
      </ul>
    )}
    <form onSubmit={handleSubmit}>
      <input type="text" name="name" id="color-name" />
      <input type="color" name="code" id="color-code" />
      <button type="submit">追加</button>
    </form>
  </div>
);
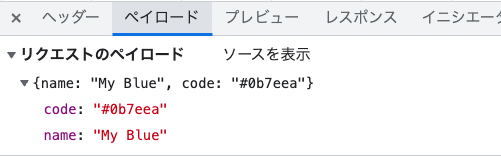
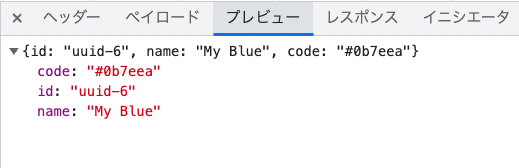
input type=”name”input type=”color”に値を入れてsubmitすると、画像のようにsubmitしたデータが追加され、レスポンスが返ってきました。

Google Chromeデベロッパーツールのネットワークタブ

Google Chromeデベロッパーツールのネットワークタブ

Google Chromeデベロッパーツールのネットワークタブ

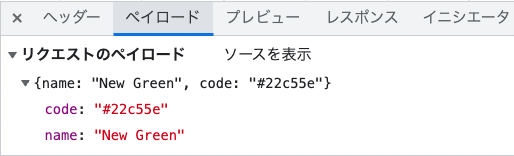
さらに、存在するカラーコード(#22c55e)を入れてPOSTリクエストしてみます。

Google Chromeデベロッパーツールのネットワークタブ

Google Chromeデベロッパーツールのネットワークタブ

Google Chromeデベロッパーツールのネットワークタブ

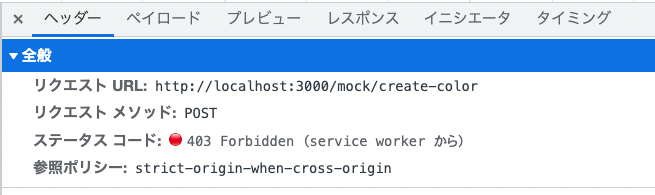
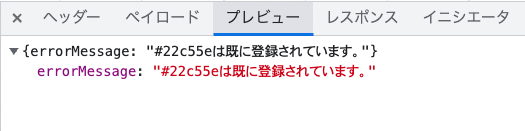
定義した通り、403エラーでエラーメッセージをレスポンスとして返すことができました。

HTTPリクエストがモックできた後は

MSWでモックAPIを作れたので、「待機」「成功」「失敗」を意識してコードを書くことができるようになりました。

下記のようにstateによってreturnするJSXを出し分けることで、各状態のUIを実装することができます。

const [loading, setLoading] = useState<boolean>(true);
const [error, setError] = useState<string>("");

if (loading) {
  return <div>Loading...</div>
}

if (error) {
  return <p>{error}</p>
}

return <div>成功した時のDOM</div>

Succeeding Through Teamwork

It is literally true that you can succeed best and quickest by helping others to succeed”, a quote by American writer Napoleon Hill and author of one of the 10 best-selling self-improvement books of all time, Think and Grow Rich. First published in 1937, the book covers a variety of philosophical business practices that - even almost 90 years after its initial publication - are still considered as one of the most important fundamentals for a person, team, or business to succeed. And yes, it can be argued that success isn’t guaranteed by simply following the most basic of guidelines; Books, people, and even the Internet (despite its vast amount of available information) are not always right - it is what you do with it to succeed.

The big question is: How would you describe or measure success? In this day and age, digital evolution has become such a big part of our daily lives, that the simplest of things, like shopping and streaming movies are now mostly done online. Meetings, remote work, and even big company events follow the same pattern. Transitioning to a digital age can or possibly should be considered a necessity, though not always as successful as one might hope. For smaller IT teams this type of change has definitely created its own set of difficulties - success isn’t always visible, but definitely measurable.

Our team currently consists of four smaller core teams: directors, designers, developers, and testers. Though each team has its own responsibilities, to succeed as a whole it is important to understand what each team does to define its own success and how their values play a role in this. Starting with our director team, it is needless to say that direct contact with the client is of high significance. Without a deeper understanding of what the client wants for its business, success cannot be achieved - it all starts with mutual respect and agreement. Similarly, the work that the director team is responsible for, has a direct effect on all the other teams. The designer cannot create a visual representation without an idea; The developer cannot build without specifications and designs; The tester cannot finish the project without the previous parts.

To ensure that the director’s work does not create any hiccups further down the line - and possibly hinder the success of the project - there are several protocols in place. Initially, the content of a new release is privately discussed between the director and designer, this to make sure what is doable within a specific timeframe. In case of a bigger release, a rough outline is shared with the design team. They create a prototype (often a variety of different designs) and share this with the other teams. Since each core team has a completely different perspective on how to use the design and whether or not it needs improvements, a prototype presentation session is held before the team takes it to the next step: sharing the prototype with the client.

The client may or may not like the design, or could even ask the designer to add changes so that it comes closer to what the company is aiming for. This also provides the director team with most of the information it needs for the technical specifications, whilst the design team focuses on the final design. Once a reviewable version of the specifications is available, each core team takes a look at the contents and provides feedback. For developers this could be related to changes to the existing code or technical matters, and for testers about testability or unusual cases in which the implementation could lead to issues. Since this whole process takes place prior to development, communication between each team is crucial.

Development and test are two equally different beasts. For example, our team consists of several developers and quality engineers to make sure the new version of the application gets exactly what was agreed on. This could be a set of small changes, or bigger additions like new screens, animations, or functionalities that would further improve the user-experience. On paper, the development team is located right in the middle, not only responsible for communication with both the director and designer team in case of further clarification or - if necessary - slight adjustments, but can also act as the direct point of contact for technical issues or questions from the quality assurance team. Once development has come to an end, the testers take over and start the final sprint towards release. Assuring a perfect and bug-free product is - in almost all cases - not possible, but through constant feedback and consultation it is a lot more likely that one team’s victory will be a step closer to measuring the success of the group. People are intrinsically purpose-oriented and believe-driven, ergo deciding where and how to start is equally important as understanding what each team believes in and what it does to reach the finish line.

To come to a close, I believe it is essential to understand the difficulties each team may struggle with. Difficulties create hurdles, and hurdles lower the speed at which you progress. Without progress you can not bring it to a successful conclusion. Though it is completely understandable that each core team is and should be in charge of its own success, not sharing any of it with the others only leads to confusion and possibly less motivation. For instance, animals follow a similar pattern. A perfect example would be wolves, where the pack is divided into smaller groups. Each smaller group has a purpose, with the one in front (the strongest) responsible for creating a path and protecting the weakest, and the one in the middle (the older ones) and the one in the back (the leader) for keeping the pack together. Trust and communication are key, as long as each individual group knows what to do to help the others succeed. “If everyone is moving forward together, then success takes care of itself.

PM始めて半年くらい経ったので振り返る

AIR Design for Marketing 事業部プロダクトマネージャー(以下、PMと表記します)の安永です。エンジニアなのですが今年からPMもやっています。

PMってやること多いですよね。巷ではミニCEOと言われることもあります。実際は組織やプロダクトの状態によってPMの定義は様々だと思いますが、未定義の場合は「プロダクトのために何でもやる人」という扱いを受けるのではないでしょうか。

当事業部でもPMという役割ができたばかりでまだ定義が曖昧なのですが、何でもできちゃうPMがいることもあってかPMは何でもやる雰囲気があります。

勿論何でもできることに越したことはないのですが、駆け出しPMの自分にとっては正直厳しく、タスクに溺れて本来PMがやるべき「プロダクトの方向性を決める」ための仕事ができなくなっていました。数ヶ月前の話です。

それからいろいろ試行錯誤を経て、今は少しは息継ぎできるくらいにはなってきました。

この記事では当時陥っていた問題と、試行錯誤の一部を紹介し、今どのように改善されたかを振り返ってみたいと思います。

プロダクトの方向性が決まらないうちに走り出すプロジェクト

私が担当することになったのは、社内の特定業務(といっても成熟した固定的なプロセスではなく、多様で変化し続けているプロセス)における課題を解決するためのプロダクトでした。

既にビジョンはあったものの、ビジョン実現のためにどんな課題を解決すればいいのか、どんな機能を作っていけばいいのかを示すプロダクトの方向性は決まっていない状態でした。

今思えばここでプロダクトの方向性を一時的にでも固めておくべきだったのですが、既にざっくりと機能の要求があったことと、「エンジニアのリソースを余らせるのはダメ」という指示があったこと、そして私のPM理解が浅かったためSTOPをかけれず、開発が始まりました。

(ちなみにこのときの機能の要求とは、「とあるツールで情報収集をしているが大変なので効率化してほしい」という要求でした。今なら「なぜそのツールで情報収集をしているのか?」「そのプロセスはどのくらいの頻度で発生するのか?」など開発の前に明らかにしなければならないことが思い浮かびますが、当時はそのまま受け入れてしまいました。)

タスクに溺れるPMと将来の見えないプロダクト

当時PMとしてやっていた仕事は、

  • 要求をヒアリングして具体化、整理
  • 機能の要求定義、仕様策定
  • エンジニアのタスクを洗い出し、アサイン、進捗管理、レビュー
  • 事業部マネージャーやターゲットユーザーが属するチームのマネージャーへの進捗報告、その資料作成
  • ユーザーサポート、ユーザーインタビュー

という感じでした。(この他にエンジニアとしての業務が発生することもありました。)

開発はスクラムでやっていましたが、その状況は、

  • チーム構成はPMとエンジニア
  • スクラムマスターとプロダクトオーナーをPMが担当
  • スプリントは1週間単位
  • レトロスペクティブ(チームに対する振り返り)はなし

という感じでした。

結果、エンジニアに渡すタスクの準備が間に合わないという形で破綻しました。スプリントプランニングまでにタスクを準備できず、プランニング内でタスクについて議論することになり、プランニングが終わらない、という事態が発生するようになりました。

見積もりもできる状態ではなく「いつリリース?」に回答できません。(そもそもこの段階で機能リリースのスケジュールに注目されている時点で期待値調整に失敗しています。)

プロダクトの方向性を考える時間も取れないので「次何するの?」に回答できず、ステークホルダーの御用聞き状態。ビジョンに近づいてるのかわかりません。

いずれの仕事も「それがPMの仕事でしょ」という扱いだったので助けてもらうこともできません。自分が駆け出しPMだから、力不足だから、と塞ぎ込み。とはいえPMとして相談してもらいやすいように明るく振る舞う。

この頃はなかなかつらみが深く、心が折れかけていました。。

チームで機能を考えてわかった要求の曖昧さ

タスクの準備が間に合わない、となってまずはエンジニアのテックリードに相談しました。決まった仕様を実装するために必要なタスクを洗い出してもらい、一時的になんとかなりましたが、長くは続きませんでした。

要求を満たすためにどんな機能、どんな仕様にすればいいかをPM1人で考えていたので、結局そこがボトルネックになっていました。同時に、なぜ1人で考えているんだろうという違和感がありました。自分がエンジニアだった頃、問題解決するためにどんな機能にするかはエンジニアが考えていました。エンジニアはどのように問題解決するかまで含めて考える力があると思っています。そして今、自分が率いている開発チームにはエンジニアがいます。チームで考えた方が絶対いいアイデアが出るぞ、と。

そこで次の一手として、タスクの準備を開発チームでやってみることにしました。

具体的には、開発チーム全員で集まり、MindMeisterというマインドマップツールを用いてタスクを分解していく会議体を設定しました。

目的としては、

  • 機能を実装するのに必要なタスク(チケット)をチームで作る。その過程でどんな機能・仕様にするかもチームで議論する。
  • マインドマップで機能やタスクの関係を可視化&なるべく細かくタスクを分解し、タスク内容を具体化する。これによりチームでの認識を揃え、タスクを受け取りやすく、見積もりをしやすくする。

を期待していました。

マインドマップによるタスク分解のイメージ。

これはうまくいきませんでした。

それまではPM1人で機能を考えていたので気付きませんでしたが、要求定義に曖昧さがあったために、機能アイデアが発散してまとまりませんでした。プランニングで議論が終わらないという問題が、前倒しになっただけでした。

また、機能・仕様が決まらないと設計はできず、設計しないと実装タスクの洗い出しはできないので、結局ほとんどタスクの洗い出しは進みませんでした。

しかしながらわかったこともありました。

  • 要求定義が曖昧だったということ
  • 要求定義が具体的になれば、エンジニアが機能を考えることはできるということ
  • 要求定義を具体化するための材料(ヒアリングや検証)が足りていないということ

です。

チームで意思決定して開発プロセスを改善していく

ここからさらに試行錯誤を重ね、さらに新メンバー(スクラムマスター資格持ち!)が加入したことによって、状況はだいぶよくなりました。この新メンバーはスクラムマスターとして加入したわけではありませんが、彼のアドバイスは試行錯誤に大きく影響を与えており、とても助けられました!

まず、PMは要求定義に責任を持ち、その要求を満たすために何をすべきかはエンジニアが責任を持つ、というルールをチームで作りました。これによりタスクの洗い出しやアサインをエンジニアに委譲することができました。要求定義は「誰の、何のための機能か」「どんな機能か」「受け入れ条件」とフォーマットに沿って書くようにし、チームにレビューしてもらい合意が取れてから着手するようになりました。機能アイデアのベースをPMが作っているところは変わっていませんが、「何のための機能か」「受け入れ条件」を明確にすることでエンジニアからフィードバックをもらいやすくなり、合意までがスムースになったと思います。

これ以外にも、チームのポリシーをドキュメントにするようにしました。タスクに影響するようなポリシーから、細かいところでSlackでメンションするときのポリシーまで、チームで議論になって方針が決まったものはポリシーとしてドキュメントにしました。あくまでポリシーなのでそれに縛られるものではなく、日々の仕事や議論の中で判断に迷ったときに参照するものとして使っています。これもタスクに関するチームの合意をスムースにしています。また、エンジニア側でも開発ルールなどをドキュメント化するようになり、チームの意思決定を形にして残す文化が醸成されつつあります。「形にして残す」ことは、議論や別のドキュメントを作る際に参照することができ、また、誰に聞かずともいつでも参照できるという点で重要だと思っています。

また、以前は基本的に実装に関するタスクだけを扱っていましたが、技術的な検証や、機能アイデアに本当に価値があるかを確かめるPoC的な検証もタスクとしてエンジニアにお願いできるようになりました。これによって実装する前に判断材料が増え、要求定義や優先度を見直せるようになりました。チームから意見できる材料にもなり、単なる御用聞きから一歩抜け出せたのではないかと思います。

地味に大きかったのがスプリント単位を1週間→2週間にしたことです。同時に進捗報告も2週間ごとにしたことで、会議やスクラムイベントの準備にかかっていた時間が大幅に削減されました。

レトロスペクティブ(チームに対する振り返り)も実施されるようになり、以降継続的に開発プロセスの改善がされるようになりました。以前は何か改善の取り組みを相談するのも心理的なハードルがありましたが、明示的に相談できる場が設けられたことによって、相談しやすくなったと思います。

まとめ:PMが今やるべきことを見極める

ここまで述べてきたような経験を経て、1人でできることの限界と、チームのありがたみを改めて感じました。

プロダクトのために何でもやるべきPMですが、現実問題として何でもはできません。なので、プロダクトのために限られたリソースで何をするかが重要になります。プロダクト開発の施策として「何をやるか」「どの順番でやるか」を考えるのは当たり前ですが、これは個人のタスクについても意識しておきたいです。

そして「今やるべきこと」が1人で難しいのであれば、チームに協力してもらうためにやるべきことが「今やるべきこと」になるでしょう。いずれにしても、自分が今やるべきことを見極めて実行していくことが、プロダクトのためでもあり、チームへの感謝・還元することになると信じて、これからもやっていきたいと思います。

www.wantedly.com