Galapagos Tech Blog

株式会社ガラパゴスのメンバーによる技術ブログです。

UIKitでTCAを使おう!

初めまして、2022年11月1日に入社した、
AIR Design for Apps事業部 iOSチームの東秀斗(ひがしひでと)です。
今回は研修で作成しているアプリ(UIKitベース)でTCA(The Composable Architecture)を使用しましたので紹介させていただきます。

以前、同メンバーがSwiftUIでTCAを使用した記事もございますので併せて紹介しておきます。
TCAの概要を知りたい方は以下の記事を先に読んだ方が良いです。

techblog.glpgs.com

techblog.glpgs.com

実行環境

  • Xcode 14.2
  • Swift 5.7.2
  • UIKit
  • TCA 0.47.2

サンプルプロジェクトを基に紹介します。

ディレクトリ構成

※初期ファイルなどの不要なファイルは非表示

.
├── SampleProject
│   ├── API
│   │   └── WeatherAPI.swift
│   ├── AppDelegate.swift
│   ├── Client
│   │   └── WeatherClient.swift
│   ├── Customs
│   │   └── CustomUITextField.swift
│   ├── Model
│   │   ├── AreaModel.swift
│   │   ├── OfficeModel.swift
│   │   └── WeatherModel.swift
│   ├── Store
│   │   └── WeatherStore.swift
│   ├── SceneDelegate.swift
│   ├── ViewControllers
│   │   ├── MainViewController.swift
│   │   └── WeatherViewController.swift
│   ├── Views
│   │   └── AreaCollectionViewCell.swift
├── SampleProjectTests
│   └── SampleProjectTests.swift
└── SampleProjectUITests
    ├── SampleProjectUITests.swift
    └── SampleProjectUITestsLaunchTests.swift

ゴール

github.com

サンプルプロジェクトの概要

  1. 起動時にAPI通信を行い、気象庁より地点のリストを受け取る
  2. 地点リストをUICollectionViewを使用して一覧表示する
  3. 検索フィールドを用意し地点の検索ができるようにする
  4. トグルを使用して検索フィールドの使用状態を変更する
  5. セルをタップしたらその地点の詳細をモーダルで表示する

※部品の初期化、配置は省略させていただきます。

1.initを追加してStoreを受け取る

final class MainViewController: UIViewController {
    // 省略
    init(store: StoreOf<WeatherStore>) {
        self.viewStore = ViewStore(store)
        super.init(nibName: nil, bundle: nil)
    }

    required init?(coder: NSCoder) {
        fatalError("init(coder:) has not been implemented")
    }
    // 省略
}
  • UIViewControllerにinitを追加する際はrequire initが必須です。
  • このViewStoreを使用してStore内のStateやActionにアクセスします

2.Storeを作成する

struct WeatherStore: ReducerProtocol {
    // viewで使用する変数を宣言する
    struct State: Equatable {
        var areaOffices: [OfficeModel] = []
        var isLoading: Bool = false
        var currentIndex: Int = 0
        var alert: AlertState<Action>?
        var searchBarText: String?
        var placeholder: String? = "都道府県を検索"
        var isEnabled: Bool = true
    }

    // viewStoreからsendされるActionを列挙型で定義する
    enum Action: Equatable {
        case fetchAreaList
        case fetchAreaListResponse(TaskResult<AreaModel>)
        case onTapCell(Int)
        case alertDismiss
        case searchBarChanged(String)
        case onTappedSwitchButton
        case onTappedClearButton
    }

    // 別ファイルで定義したconcurrencyな関数をDependencyから呼び出す(詳細は後述)
    @Dependency(\.weatherClient) var weatherClient

    // API通信をキャンセルする用
    enum CancelID {}

    func reduce(into state: inout State, action: Action) -> EffectTask<Action> {
        switch action {
        case .fetchAreaList:
            state.isLoading = true
            state.areaOffices = []
            return .task {
                await .fetchAreaListResponse(TaskResult{ try await weatherClient.fetchAreaList() })
            }
            // ①
            .cancellable(id: CancelID.self)
        case .fetchAreaListResponse(.success(let response)):
            state.isLoading = false
            var responseOffices: [OfficeModel] = []
            response.offices.forEach {
                responseOffices.append(OfficeModel(areaCode: $0.key, office: $0.value))
            }
            responseOffices = responseOffices.sorted(by: {
                $0.areaCode < $1.areaCode
            })
            if let searchBarText = state.searchBarText, !searchBarText.isEmpty {
                state.areaOffices = responseOffices.filter{ $0.office.name.contains(searchBarText) }
            } else {
                state.areaOffices = responseOffices
            }
            return .none
        case .fetchAreaListResponse(.failure):
            state.alert = AlertState(title: TextState("エラー"), message: TextState("データ読み込みが失敗しました"))
            state.isLoading = false
            return .none
        case .onTapCell(let indexPathRow):
            state.currentIndex = indexPathRow
            return .none
        case .alertDismiss:
            state.alert = nil
            return .none
        case .searchBarChanged(let text):
            state.searchBarText = text
            // ②
            return .merge(
                .cancel(id: CancelID.self),
                .task {
                    .fetchAreaList
                }
            )
        case .onTappedSwitchButton:
            state.isEnabled = !state.isEnabled
            state.placeholder = state.isEnabled ? "都道府県を検索" : "使用不可"
            return .none
        case .onTappedClearButton:
            guard let searchBarText = state.searchBarText,
                  !searchBarText.isEmpty
            else { return .none }
            state.searchBarText = nil
            return .task {
                .fetchAreaList
            }
        }
    }
}

// UICollectionViewのdataSourceに使用するために定義
extension WeatherStore {
    enum Section: Hashable, CaseIterable {
        case areaOffices
    }

    enum Item: Hashable, Equatable {
        case areaOffices(OfficeModel)
    }
}

extension WeatherStore.State {
    typealias Section = WeatherStore.Section
    typealias Item = WeatherStore.Item
    typealias Snapshot = NSDiffableDataSourceSnapshot<Section, Item>

    var snapshot: Snapshot {
        var snapshot = Snapshot()
        snapshot.appendSections([.areaOffices])
        snapshot.appendItems(areaOffices.map(Item.areaOffices))
        return snapshot
    }
}
  • .cancellable(id: AnyHashable)はキャンセルする場合があるEffectTaskに付与する
  • .merge()はEffectPublisherを配列で受け取り、それらを同時実行するEffectTask。 EffectPublisher -> .none.task.run.fireAndForgetなど

3.部品にStoreのStateを紐づける

class MainViewController: UIViewController {
    // 省略
    
    override func viewDidLoad() {
        super.viewDidLoad()

        // ①
        viewStore.publisher.placeholder
            .assign(to: \.placeholder, on: searchTextField)
            .store(in: &cancellables)

        viewStore.publisher.isEnabled
            .assign(to: \.isEnabled, on: searchTextField)
            .store(in: &cancellables)

        viewStore.publisher.isEnabled
            .assign(to: \.isEnabled, on: clearButton)
            .store(in: &cancellables)

        viewStore.publisher.searchBarText
            .assign(to: \.text, on: searchTextField)
            .store(in: &cancellables)

        // ②
        viewStore.publisher.isLoading.map({!$0})
            .assign(to: \.isHidden, on: activityIndicator)
            .store(in: &cancellables)

        viewStore.publisher.alert
            .sink { [weak self] alert in
                guard let self = self else { return }
                guard let alert = alert else { return }
                let alertController = UIAlertController(title: String(state: alert.title),
                                                        message: String(state: alert.message ?? TextState("")),
                                                        preferredStyle: .alert)
                alertController.addAction(
                    UIAlertAction(title: "Ok", style: .default) { _ in
                        self.viewStore.send(.alertDismiss)
                    }
                )
                self.present(alertController, animated: true)
            }
            .store(in: &cancellables)
    }
    // 省略
}
  • .assign(to: ReferenceWritableKeyPath<Root, Bool>, on: Root)torootに指定するViewのメンバーを指定します。
  • また、toがオプショナルの場合、StoreのStateもオプショナルである必要があります。①の場合、UITextViewのplaceholderはオプショナル型のStringなので、
  • StoreのStateで宣言したplaceholderも併せてオプショナル型のStringにしています。
  • ②ではisLoadingをactivityIndicatorのisHiddenに設定していますが、isLoadingは通信中にtrue、それ以外にfalseになるので、isHiddenにそのまま設定してしまうと通信中にactivityIndicatorが非表示になり、それ以外の時に表示されてしうので.mapを使用してisLoadingを反転させてから設定しています。

4.API通信を行うClientを作成する

struct WeatherClient {
    var fetchAreaList: @Sendable () async throws -> AreaModel
    var fetchWeatherInfomation: @Sendable (_ areaCode: String) async throws -> WeatherModel
}

extension DependencyValues {
    var weatherClient: WeatherClient {
        get { self[WeatherClient.self] }
        set { self[WeatherClient.self] = newValue }
    }
}

extension WeatherClient: DependencyKey {
    static var liveValue: WeatherClient {
        Value(fetchAreaList: {
            let areApiUrl: String = "https://www.jma.go.jp/bosai/common/const/area.json"
            let (data, _) = try await APICaller.shared.fetch(url: areApiUrl)
            let jsonDecoder = JSONDecoder()
            try await Task.sleep(nanoseconds: 500_000_000)
            return try jsonDecoder.decode(AreaModel.self, from: data)
        }, fetchWeatherInfomation: { areaCode in
            let weatherApiUrl: String = "https://www.jma.go.jp/bosai/forecast/data/forecast/\(areaCode).json"
            let (data, _) = try await APICaller.shared.fetch(url: weatherApiUrl)
            let dictData = try JSONSerialization.jsonObject(with: data, options: .fragmentsAllowed) as! [Any]
            let json = try JSONSerialization.data(withJSONObject: dictData)
            return try APICaller.shared.decode(data: json)
        })
    }

    static var testValue = liveValue
}
  • StoreでClientを使用するにはDependencyValuesに追加する必要があります。
  • 追加すると、Store内で@Dependency(\.WeatherClient)で参照することができるようになります。
  • testValueは必須ではありませんが、単体テストを行うときに必要になります。

5.タップや文字入力時のイベントにStoreのActionを紐づける

extension MainViewController {
    @objc private func searchBarTextFieldChanged(sender: UITextField) {
        viewStore.send(.searchBarChanged(sender.text ?? ""))
    }

    @objc private func onTapClearButton(sender: UIButton) {
        viewStore.send(.onTappedClearButton)
    }

    @objc private func onTapSwitchButton(sender: UISwitch) {
        viewStore.send(.onTappedSwitchButton)
    }
}
  • sendを使用してViewからReducerにイベントを送信します。

viewStore.send(.onTappedClearButton)の場合、検索フィールドをクリアするボタンが押された時にWeatherStorereduce内の以下の処理が実行されます。

struct WeatherStore: ReducerProtocol {
    // 省略

    func reduce(into state: inout State, action: Action) -> EffectTask<Action> {
        switch action {
        // 省略
        case .onTappedClearButton:
            guard let searchBarText = state.searchBarText,
                  !searchBarText.isEmpty
            else {
                return .none
            }
            state.searchBarText = nil
            return .task {
                .fetchAreaList
            }
        }
    }
}

以上がUIKitでTCAを利用する基本となります。
SwiftUIベースで一部をUIKitで作るというようなケースで多少は役に立つかと思います。

小ネタ

reduceを分割する

TCAの気になるポイントはreduceの肥大化です。
分割のメリットとして、関連する処理(API通信の送受信のActionなど)をひとまとめにできることだと思います。
※ベストプラクティスではないので採用するかは、個人またはチームの判断になると思いますので注意 先ほどのWeatherStoreを変更します。

enum Action: Equatable {
    // - case fetchAreaList
    // - case fetchAreaListResponse(TaskResult<WeatherModel>)
    case fetchAreaAction(FetchAreaAction)
    // 省略

    enum FetchAreaAction: Equatable {
        case fetchAreaList
        case fetchAreaListResponse(TaskResult<WeatherModel>)
    }
}

Action内にまた小さなActionを作成します。
作成したActionを処理する小さなReducerを作成します。

extension WeatherStore {
    func fetchAreaReduce(state: inout State, action: Action.FetchAreaAction) -> EffectTask<Action> {
        switch action {
        case .fetchAreaList:
            // 分割する前のreduceと同じ処理をかく
        case .fetchAreaListResponse(.success(let response)):
            // 分割する前のreduceと同じ処理をかく
        case .fetchAreaListResponse(.failure):
            // 分割する前のreduceと同じ処理をかく
        }
    }
}

reduce内にあった分割する前のactionを削除し、新しく作った小さいactionを追加します。

func reduce(into state: inout State, action: Action) -> EffectTask<Action> {
    switch action {
    // - case .fetchAreaList:
    // - case .fetchAreaListResponse(.success):
    // - case .fetchAreaListResponse(.failure):
    case .fetchAreaList(let action):
        return fetchAreaReduce(state: &state, action: action)
    }
}

これで、メインのreduceからまとまった処理を抜き取り、分割することができました。

以上でUIKitでTCAを使用する例の紹介を終わります。 詳細は以下のサンプルコードをご確認ください。 github.com
気象庁 Japan Meteorological Agency

Dart3を試してみる

最近2匹の猫との生活を始めました、アプリエンジニアチームの務台です。

今回は今年中旬に正式リリースと噂のDart3を使って、みんな大好きTodoアプリを作成してみたので、その感想等を共有できればと思います。 なお、2023/03/17時点ではまだアルファ版のため、今後機能の変更や削除の可能性があります。

作成したアプリのソースはこちらです。

github.com

実行環境

  • Flutter: 3.8.0-7.0.pre.2 (masterチャンネル)
  • Dart: Dart 3.0.0 (build 3.0.0-204.0.dev)

開発時の注意

Dart3の機能はまだ正式リリースされていないため、コンパイル時に以下のオプションで明示的に指定する必要があります。

--enable-experiment=records,class-modifiers,sealed-class,patterns

また、lintや自動整形も効かなくなってしまうため注意が必要です。

新機能について

Dart3で追加される新機能については以下にまとめられています。

medium.com

ここにあるように、Dart3の新機能には大きく以下のものがあります。

  • record型の追加
  • パターンマッチングの追加
  • クラス修飾子の追加

それぞれの説明、使用した感想等についてまとめていきます。

record型

概要

複数の値をまとめたものを、簡単に新たな型として使うことができる機能です。

以下のような、天気温度湿度を取得する関数を作るとします。

[気候型] fetchClimate() {
  // 天気、温度、湿度を取得して返す
}

従来では気候型のクラスを作って、それを返すようにする必要がありました。

@immutable
class Climate {
  const Climate(
    this.weather,
    this.tempereture,
    this.humidity,
  );

  final String weather;
  final double tempereture;
  final double humidity;
}

Climate fetchClimate() {
  return Climate('晴れ', 18.4, 70.4);
}

record型を使うことでわざわざクラスを新設せず、以下のように簡易的に記述することができるようになりました。

(String weather, double temperature, double humidity) fetchClimate() {
  return ('晴れ', 18.4, 70.4);
}

感想

かなり短く書くことができるようになりますが、個人的には基本的にrecord型は使わない方が良いかと思っています。 その理由として、record型は関数ごとに新たに返却するための型を宣言し直す必要があるため、同じデータを返すはずなのに型が違っている、という状況が起こり得ます。また、型の名前をつけることができないため、取得できるデータはなんなのかが推測しづらくなってしまいます。

…と思っているので、今回のサンプルアプリではrecord型は使用していません。スミマセン。

パターンマッチング

概要

パターンマッチングとは特定のパターンにマッチするデータを取得することができる機能です。 後述のsealed classと組み合わせることにより、以下のように実際の型に合わせて処理を変える、ということができるようになります。

sealed class Shape {}

class Square implements Shape {
  final double length;
  Square(this.length);
}

class Circle implements Shape {
  final double radius;
  Circle(this.radius);
}

double calculateArea(Shape shape) => switch (shape) {
  Square(length: var l) => l * l,
  Circle(radius: var r) => math.pi * r * r
};

このような分岐は、既存ではFreezedを使用することで実現できていましたが、これでパッケージ無しで同様のことができるようになります。

特に嬉しいのがswitchを式として利用できるようになったことで、以前ではreturnを複数書かなければいけなかったものを簡潔に記述することができるようになりました。

感想

サンプルではTodoStatussealed classとして用意して、Screen側で値によってアイコンを出し分ける、という処理を行っています。

lib/feature/todo/domain/value/todo_status.dart

sealed class TodoStatus{
  String get statusString;
}

@immutable
final class NotStarted implements TodoStatus{
  @override
  String get statusString => 'NotStarted';
}

@immutable
final class InProgress implements TodoStatus{
  @override
  String get statusString => 'InProgress';
}

@immutable
final class Finished implements TodoStatus{
  @override
  String get statusString => 'Finished';
}

lib/feature/todo/presentation/todo_list/widget/todo_item.dart

// 27行目 アイコンの切り替え
leading: Icon(
  switch(status) {
    NotStarted() => Icons.radio_button_unchecked,
    InProgress() => Icons.more_horiz,
    Finished() => Icons.radio_button_checked,
  }, 
  color: Colors.grey,
),

// 61行目 背景色の切り替え
tileColor: switch(status) {
  NotStarted() => Colors.transparent,
  InProgress() => const Color.fromARGB(255, 207, 253, 209),
  Finished() => const Color.fromARGB(255, 207, 207, 207),
},

ステータスによる表示の切り替えを簡潔に記述することができ、とても使い勝手が良かったです。

クラス修飾子の追加

概要

ここでのクラス修飾子とはclassの前につく修飾子のことで、今までDartにはabstractくらいしか存在しませんでした。 Dart3からは一気に増えて、以下のキーワードが使用できるようになります。

宣言 説明
interface class このクラスの継承を不可にする。他の言語でのinterfaceと同様だが、interface内でメソッドを実装する必要がある。
base class 暗黙的インターフェースを無効にすることで、implementによる実装を無効にする。
final class このクラスの継承、実装、ミックスインを禁止する。
sealed class パターンマッチングで使用したように、複数のクラスを一つのグループとしてまとめる。
mixin class 他クラスへのミックスインを有効化する

感想

今までは暗黙的インターフェースにより意図しない継承、実装が可能だった点が微妙だと思っていたのですが、finalによりそれを封じることができるようになった点はとてもありがたいと感じました。プロダクト開発では基本的にfinalを付けてクラス定義していくのが良さそうです。

interfaceについて、抽象メソッドを持つことができないため、UnimplementedErrorを投げる等、不要な実装が必要になってしまうのが微妙かなと感じました。

lib/feature/todo/repository/todo_repository.dart

interface class TodoRepository {
  Future<int> add(domain.Todo todo) => throw UnimplementedError();
  Future<int> update(domain.Todo todo) => throw UnimplementedError();
  Future<void> delete(int id) => throw UnimplementedError();
  Stream<List<domain.Todo>> watchAll() => throw UnimplementedError();
  Future<domain.Todo> fetch(int id) => throw UnimplementedError();
}

ただし、2023/03/17現在ではinterface classを継承してもコンパイルエラーにならなかったため、まだまだ変更、修正の可能性はあるのかなぁと思っています。

まとめ

個人的には暗黙的インターフェースの仕組みがあまり好きではなかったので、明示的に無効化できるようになってかなり便利だなぁと感じました。 その他の新機能についても、これまでFreezedが必要だった部分が言語としてサポートされて、今後に期待できそうです。

次はバリューオブジェクト型が増えるといいなぁ。

UITableViewDiffableDataSourceを使用しよう

こんにちは。AIR Design for Apps事業部 iOSチームのデニスです。ファッション・アパレル通販アプリの開発を担当しています。

SwiftUIはiOSエンジニアの間でかなり人気が高まっているフレームワークですが、多くのプロジェクトではまだUIKitが使用されています。最初のiPhoneが登場した時にiOSの開発が始まって以来、最も使われたViewControllerはテーブル形式の表示画面だと思います。UITableViewの作成は簡単ですが、セルのデキュー、セクションやヘッダなどの部分を実装するため、やはりボイラープレートコードが多くなり、気づかずにViewControllerが大きくなってしまいます。私のプロジェクトでも同じ問題があり、最近はUITableViewの代わりにUITableViewDiffableDataSourceを使用し始めました。

UITableViewDiffableDataSourceの違い

UITableViewと比べてみると、UITableViewDiffableDataSourceで大きく変わった点はSnapshotとHashable (ハッシュ可能なItemIdentifier) の導入です。以前の実装ではUITableViewCellをデキューしたい時に、numberOfSections、numberOfRowsInSectionとcellForRowAtを使用し、UITableViewを更新するためreloadDataを呼び出す必要がありました。これらのメソッドはSnapshotの導入によって非推奨となりました。UITableViewDiffableDataSourceに関しては以下の例を見てもらうのが分かりやすいと思います。サンプルアプリとして買い物リストを作ってみましょう。

Step 1: プロジェクトの準備・データモデル作成

Storyboardなしのプロジェクト作成で実装を容易にするため、まず基本的なカスタムセルを追加します。

class ProductCell: UITableViewCell {
    let label = UILabel()

    override init(style: UITableViewCell.CellStyle,
                  reuseIdentifier: String?) {
        super.init(style: style, reuseIdentifier: reuseIdentifier)
        label.translatesAutoresizingMaskIntoConstraints = false

        contentView.addSubview(label)
        label.font = .systemFont(ofSize: 15)
        label.textColor = .darkGray

        NSLayoutConstraint.activate([
            label.leadingAnchor.constraint(equalTo:
                                            contentView.leadingAnchor, 
                                           constant: 20),
            label.centerYAnchor.constraint(equalTo:
                                            contentView.centerYAnchor)
        ])
    }

    required init?(coder: NSCoder) {
        fatalError("init(coder:) has not been implemented")
    }
}

前に述べたように、UITableViewDiffableDataSourceのアイテムに対応するデータモデルがHashableに適合している必要があるので、ハッシュ可能なStructを追加します。この例ではnameだけを使用します。

struct Food: Hashable {
    let name: String
}

今回の商品は果物なので、まずFoodTypeを作成し、アイテムをハッシュ可能なFoodに設定します。例としてはstandardFoodのcaseを追加します。

enum FoodType {
    case standardFood
}

enum ProductItem {
    case product(Food)
}

次はUITableViewControllerに取り掛かりましょう。

Step 2: DiffableDataSource

DataSourceとSnapshotを実装する前にベーシックなUITableViewControllerを作成し、買い物リストの配列を追加します。一つ前のステップで作成したセルもregisterします。

class ViewController: UITableViewController {
    private let foodArray = [Food(name: "Apples"),
                             Food(name: "Bananas"),
                             Food(name: "Oranges"),
                             Food(name: "Beef"),
                             Food(name: "Pork")
]

    override func viewDidLoad() {
        super.viewDidLoad()
        navigationItem.title = "Shopping List"
        navigationController?.navigationBar.prefersLargeTitles = true
        tableView.register(ProductCell.self,
                           forCellReuseIdentifier: "ProductCell")
    }
}

さて、次はどうすれば良いでしょうか。まずDataSourceを作成したいのですが、UITableViewDiffableDataSourceの内容を確認すると、SectionIdentifierTypeが必要そうです。では、セクションとアイテムの列挙型を作りましょう。

このままでDataSourceを追加することができます。ソースを保持する変数が必要なので、まずprivate lazy varを追加します。

private lazy var dataSource = configureDataSource()

次のステップでDataSourceの関数を作成したいと思います。読みやすくするためにDataSourceのtypealiasを使用し、戻り値の型としてconfigureDataSourceに追加します。UITableViewDiffableDataSourceの期待値がtableView、indexPathとCellProviderなので、直接Foodを使用し、ProductCellとしてデキューします。ラベルがありますので、簡単にitem (Food系) のnameをテキストに追加することができます。

private typealias DataSource =
    UITableViewDiffableDataSource<FoodType, Food>

private func configureDataSource() -> DataSource {
    return UITableViewDiffableDataSource(tableView: tableView,
                                         cellProvider: { table, index, food in
        let cell = table.dequeueReusableCell(withIdentifier: "ProductCell",
                                             for: indexPath) as? ProductCell
        cell?.label.text = food.name
        return cell
    })
}

DataSourceを作成しましたので、Snapshotを作りましょう。

Step 3: SnapshotでUITableViewを更新

DataSourceと同じように、まずNSDiffableDataSourceSnapshotのtypealiasを作成します。

private typealias Snapshot = 
    NSDiffableDataSourceSnapshot<FoodType, Food>

Snapshotはまだ何の機能もありません。UITableViewにデータを入れる為の関数を実装していきましょう。NSDiffableDataSourceSnapshotを確認すると、SectionIdentifierTypeとItemIdentifierTypeが必要なようです。以前に追加したProductSectionを使用して、簡単にappendSectionsに追加することができます。appendItemsのためfoodArrayをmapし、Snapshotが完了しました。

private func createSnapshot() {
    var snapshot = Snapshot()
    snapshot.appendSections([.standardFood])
    snapshot.appendItems(foodArray.map { $0 })
    dataSource.apply(snapshot, animatingDifferences: false)
}

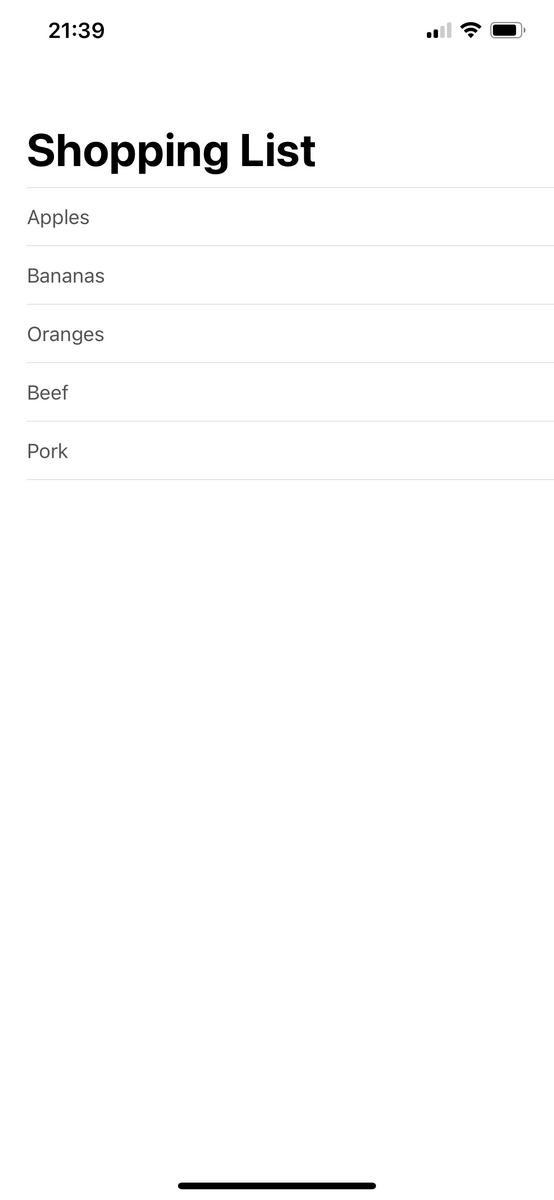
最後にviewDidLoadにcreateSnapshotの関数を追加することです。結果は以下の通りになるはずです。

Step 4: Sectionで分けたい

ここのままでは果物と肉が一緒でわかりにくいですね。セクションを追加して食品の種類を分けて、DataSourceを改善しましょう。まずProductCellと同じく、カスタムヘッダを追加し、viewDidLoadの中にregisterします。

class SectionHeader: UITableViewHeaderFooterView {
    let label = UILabel()

    override init(reuseIdentifier: String?) {
        super.init(reuseIdentifier: "SectionHeader")
        label.translatesAutoresizingMaskIntoConstraints = false

        contentView.addSubview(label)
        label.font = .systemFont(ofSize: 16, weight: .bold)

        NSLayoutConstraint.activate([
            label.leadingAnchor.constraint(equalTo:
                                            contentView.leadingAnchor,
                                           constant: 20),
            label.centerYAnchor.constraint(equalTo:
                                            contentView.centerYAnchor)
        ])
    }

    required init?(coder aDecoder: NSCoder) {
        super.init(coder: aDecoder)
    }
}

ViewDidLoadはこうなります。

override func viewDidLoad() {
    super.viewDidLoad()
    navigationItem.title = "Shopping List"
    navigationController?.navigationBar.prefersLargeTitles = true
    tableView.register(ProductCell.self,
                       forCellReuseIdentifier: "ProductCell")
    tableView.register(SectionHeader.self,
                       forHeaderFooterViewReuseIdentifier: "SectionHeader")
    createSnapshot()
}

次はFoodTypeに追加されたStandardFoodの代わりに「果物」と「肉」のcaseを使用したいと思います。

enum FoodType {
    case fruit
    case meat
}

最後にfoodArrayに商品のtypeを追加したいですが、FoodTypeが不明なので、まずFoodのstructを改善しましょう。

struct Food: Hashable {
    let name: String
    let type: FoodType
}

そうすることによって、foodArrayの中にtypeで分けることができます。

private let foodArray = [Food(name: "Apples", type: .fruit),
                         Food(name: "Bananas", type: .fruit),
                         Food(name: "Oranges", type: .fruit),
                         Food(name: "Beef", type: .meat),
                         Food(name: "Pork", type: .meat)]

では、もう一度Snapshotの関数を確認しましょう。FoodTypeが追加されましたので、簡単にセクションで分けられるようになると思います。appendSectionsにfruitとmeatのcaseを追加し、foodArrayのアイテムを正しいセクションに入れることができます。

snapshot.appendSections([.fruit, .meat])
snapshot.appendItems(foodArray.map { $0 }.filter { $0.type == .fruit },
                     toSection: .fruit)
snapshot.appendItems(foodArray.map { $0 }.filter { $0.type == .meat },
                     toSection: .meat)

このままで分けましたが、セクションのヘッダはまだ使用していませんので最後のステップで対応しましょう。

まず、FoodTypeにtitleを追加したいと思います。

enum FoodType {
    case fruit
    case meat

    var title: String {
        switch self {
        case .fruit: return "FRUIT"
        case .meat: return "MEAT"
        }
    }
}

最後にUIKitのviewForHeaderInSectionを使用しますが、今回はSnapshotを使用しているので、配列ごとにDataSourceから正しいセクションを得る必要があります。これはUITableViewDiffableDataSourceのsectionIdentifiersで対応できます。

override func tableView(_ tableView: UITableView,
                        viewForHeaderInSection section: Int) -> UIView? {
    let sectionTitle =
        dataSource.snapshot().sectionIdentifiers[section].title
    if let view =
        tableView.dequeueReusableHeaderFooterView(withIdentifier: "SectionHeader")
        as? SectionHeader {
        view.label.text = sectionTitle
        return view
    }
    return nil
}

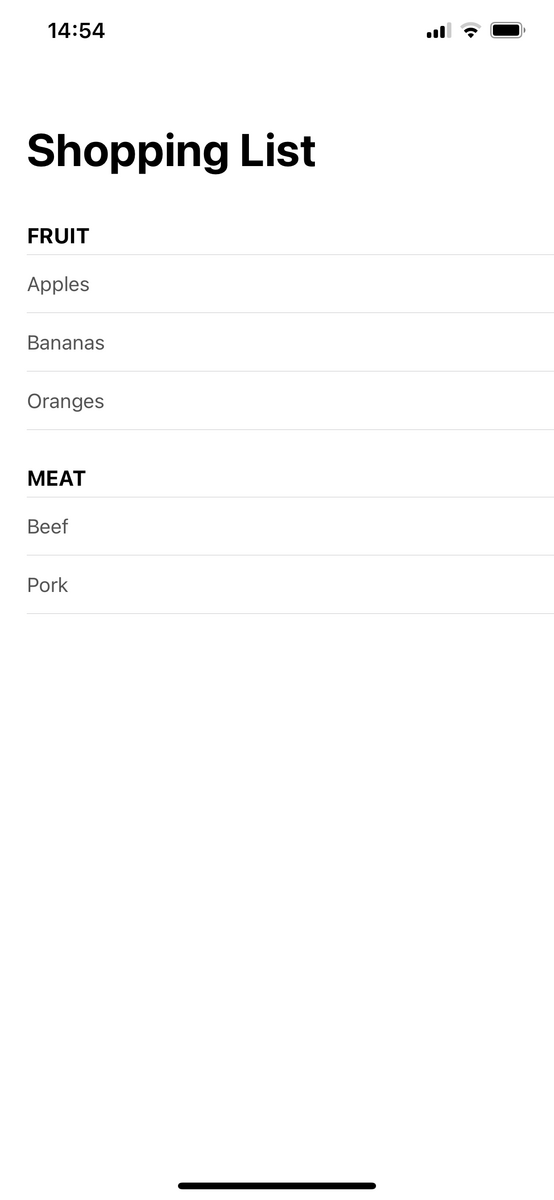
これだけで結果は以下の通りになります。

まとめ

UITableViewDiffableDataSourceは旧型より便利で、UITableViewを簡単に作成できるし、更新はcreateSnapshotの関数だけでできます。今回作ったTableViewはとてもシンプルでしたが、必要であれば単独セクションかアイテムも更新することができるので、別の機会に説明したいと思います。